6bbceebe86c0cef2bf9da536b54793df


Are you looking for a way to sharpen your Japanese knife? If so, you’ve come to the right place! In this article, we’ll provide you with a step-by-step guide on how to sharpen a Japanese knife. We’ll cover the different types of sharpening stones, the proper technique for sharpening, and the best way to maintain your knife’s sharpness. With this guide, you’ll be able to keep your Japanese knife in top condition and enjoy its sharpness for years to come. So, let’s get started!
What is the best angle to sharpen Japanese knives
Japanese knives are renowned for their sharpness and precision. To keep them in top condition, it is important to sharpen them regularly. But what is the best angle to sharpen Japanese knives?
The answer depends on the type of knife you are using. Generally, Japanese knives are sharpened at a much sharper angle than Western knives. The most common angle for sharpening Japanese knives is between 10 and 15 degrees. This is much sharper than the 20 to 25 degree angle used for Western knives.
The best angle to sharpen a Japanese knife depends on the type of steel used in the blade. Harder steels require a sharper angle, while softer steels can be sharpened at a slightly lower angle. It is important to use the correct angle for the type of steel in order to get the best results.
It is also important to use the correct sharpening technique. Japanese knives are usually sharpened using a whetstone or a sharpening rod. It is important to use a light touch and to move the blade in a circular motion. This will ensure that the blade is sharpened evenly and that the edge is not damaged.
Sharpening Japanese knives can be a tricky process, but with the right technique and the correct angle, it is possible to keep your knives in top condition. With regular sharpening, your Japanese knives will stay sharp and precise for many years to come.
How do you sharpen a knife step by step
Sharpening a knife is an important skill to have in the kitchen. It is essential for keeping your knives in good condition and ensuring that they are safe to use. Here are the steps to follow when sharpening a knife:
Step 1: Gather the Necessary Materials
Before you begin sharpening your knife, you will need to gather the necessary materials. You will need a sharpening stone, a honing steel, a cloth, and some lubricant. The sharpening stone is used to grind away the dull edges of the blade, while the honing steel is used to realign the blade’s edge. The cloth is used to wipe away any debris, and the lubricant is used to keep the blade from becoming too hot.
Step 2: Prepare the Knife
Once you have gathered the necessary materials, you will need to prepare the knife. Start by wiping the blade with the cloth to remove any debris. Then, apply a few drops of lubricant to the blade. This will help to keep the blade from becoming too hot during the sharpening process.
Step 3: Sharpen the Knife
Now it is time to sharpen the knife. Start by placing the sharpening stone on a flat surface. Hold the knife at a 20-degree angle and begin to move the blade across the stone in a circular motion. Make sure to keep the angle consistent throughout the process. After a few passes, you should begin to see a burr forming on the blade. This is an indication that the blade is being sharpened.
Step 4: Hone the Knife
Once the blade has been sharpened, it is time to hone the knife. Start by placing the honing steel on a flat surface. Hold the knife at a 20-degree angle and begin to move the blade across the steel in a circular motion. Make sure to keep the angle consistent throughout the process. After a few passes, you should begin to see a burr forming on the blade. This is an indication that the blade is being honed.
Step 5: Clean and Store the Knife
Once you have finished sharpening and honing the knife, it is time to clean and store it. Start by wiping the blade with the cloth to remove any debris. Then, apply a few drops of lubricant to the blade. This will help to keep the blade from becoming too hot during storage. Finally, store the knife in a safe place, such as a knife block or a drawer.
Sharpening a knife is an important skill to have in the kitchen. By following these steps, you can ensure that your knives are always in good condition and safe to use. So, the next time you need to sharpen a knife, just follow these steps and you’ll be ready to go.
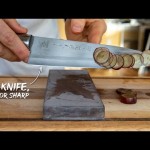
How do you sharpen Japanese knives with a whetstone
Sharpening a Japanese knife with a whetstone is a great way to keep your knife in top condition. It is important to use the correct technique to ensure that your knife is sharpened correctly and safely. Here are some tips on how to sharpen a Japanese knife with a whetstone.
Step 1: Choose the Right Whetstone
The first step in sharpening a Japanese knife with a whetstone is to choose the right whetstone. There are many different types of whetstones available, so it is important to choose one that is suitable for your knife. Generally, a medium-grit whetstone is best for sharpening Japanese knives.
Step 2: Soak the Whetstone
Once you have chosen the right whetstone, it is important to soak it in water for at least 10 minutes. This will help to ensure that the whetstone is properly lubricated and will help to prevent it from becoming too dry during the sharpening process.
Step 3: Start Sharpening
Once the whetstone is soaked, it is time to start sharpening. Place the whetstone on a flat surface and hold the knife at a 20-degree angle against the stone. Gently move the knife back and forth across the stone, applying light pressure. Make sure to keep the angle consistent throughout the sharpening process.
Step 4: Flip the Knife and Repeat
Once you have finished sharpening one side of the knife, flip it over and repeat the process on the other side. Make sure to keep the angle consistent and to apply light pressure. Once both sides of the knife have been sharpened, it is time to move on to the next step.
Step 5: Check the Edge
Once you have finished sharpening the knife, it is important to check the edge. To do this, run your finger along the edge of the blade. If it feels sharp and smooth, then the knife is sharpened correctly. If it feels dull or rough, then you may need to repeat the sharpening process.
Step 6: Clean and Store the Knife
Once you have finished sharpening the knife, it is important to clean and store it properly. Use a damp cloth to wipe off any excess water or debris from the blade. Then, store the knife in a safe place, away from moisture and heat. This will help to ensure that your knife stays sharp for a long time.
Conclusion
Sharpening a Japanese knife with a whetstone is a great way to keep your knife in top condition. It is important to use the correct technique and to choose the right whetstone. With a bit of practice, you can easily sharpen your Japanese knife with a whetstone and keep it in top condition.
What is the order of the five stages of sharpening a knife
Sharpening a knife is an important skill to have, as it can help you keep your knives in top condition and make them last longer. Knowing the order of the five stages of sharpening a knife is essential for getting the best results.
Stage 1: Preparing the Knife
The first step in sharpening a knife is to prepare the knife. This involves cleaning the blade and removing any dirt or debris that may be on it. You should also check the blade for any nicks or chips that may need to be repaired.
Stage 2: Setting the Angle
The second step is to set the angle of the blade. This is done by placing the blade against the sharpening stone at the desired angle. It is important to make sure that the angle is consistent throughout the sharpening process.
Stage 3: Sharpening the Knife
Once the angle is set, the next step is to begin sharpening the knife. This is done by running the blade along the sharpening stone in a back-and-forth motion. It is important to keep the angle consistent and to use light pressure when sharpening.
Stage 4: Honing the Knife
The fourth step is to hone the knife. This is done by running the blade along a honing steel in a back-and-forth motion. This helps to realign the blade and remove any burrs that may have been created during the sharpening process.
Stage 5: Testing the Knife
The final step is to test the knife. This is done by cutting a piece of paper or cardboard to see if the blade is sharp enough. If the blade is not sharp enough, you can repeat the sharpening process until it is.
In conclusion, the order of the five stages of sharpening a knife is: preparing the knife, setting the angle, sharpening the knife, honing the knife, and testing the knife. Following these steps will help you get the best results when sharpening your knives.
We hope this guide has been helpful in teaching you how to sharpen a Japanese knife. With the right tools and technique, you can keep your knife sharp and ready for use. Thank you for reading and goodbye!