Are you looking for an easy and affordable way to organize your home? IKEA’s magnetic strips are the perfect solution! Not only are they affordable, but they are also incredibly versatile and can be used in a variety of ways to help you keep your home neat and tidy. In this article, we’ll discuss the many benefits of using an IKEA magnetic strip to organize your home, as well as some tips and tricks for getting the most out of your purchase. So, if you’re ready to get organized, read on to learn more about how an IKEA magnetic strip can help you achieve your goals!
How do you install Ikea magnetic knife strips without drilling
Installing an Ikea magnetic knife strip is a great way to keep your kitchen knives organized and safe. But what if you don’t want to drill holes in your wall? Fortunately, there are several ways to install an Ikea magnetic knife strip without drilling.
Using Adhesive Strips
One of the easiest ways to install an Ikea magnetic knife strip without drilling is to use adhesive strips. These strips are designed to hold up to 5kg of weight, so they are perfect for holding a magnetic knife strip. All you need to do is clean the wall, peel off the adhesive backing, and press the strip firmly against the wall. Make sure to press firmly and evenly to ensure a secure hold.
Using Command Strips
Another option for installing an Ikea magnetic knife strip without drilling is to use Command Strips. These strips are designed to hold up to 4.5kg of weight, so they are perfect for holding a magnetic knife strip. All you need to do is clean the wall, peel off the adhesive backing, and press the strip firmly against the wall. Make sure to press firmly and evenly to ensure a secure hold.
Using Double-Sided Tape
If you don’t want to use adhesive strips or Command Strips, you can also use double-sided tape. This type of tape is designed to hold up to 3kg of weight, so it is perfect for holding a magnetic knife strip. All you need to do is clean the wall, peel off the adhesive backing, and press the tape firmly against the wall. Make sure to press firmly and evenly to ensure a secure hold.
Conclusion
Installing an Ikea magnetic knife strip without drilling is easy and can be done with adhesive strips, Command Strips, or double-sided tape. All you need to do is clean the wall, peel off the adhesive backing, and press the strip or tape firmly against the wall. Make sure to press firmly and evenly to ensure a secure hold.
How do you install magnetic knife strips on the wall
Installing a magnetic knife strip on the wall is a great way to store your knives safely and conveniently. It is also a great way to free up counter space in your kitchen. Here are the steps to install a magnetic knife strip on the wall:
Step 1: Choose the Right Location
The first step is to choose the right location for your magnetic knife strip. You want to make sure that the strip is not too close to any heat sources, such as a stove or oven. You also want to make sure that the strip is not too high or too low, so that you can easily reach the knives when you need them.
Step 2: Mark the Wall
Once you have chosen the right location, you will need to mark the wall where you want to install the magnetic knife strip. You can use a pencil or a marker to make the marks. Make sure that the marks are level and straight, so that the strip will be installed correctly.
Step 3: Drill the Holes
Once you have marked the wall, you will need to drill the holes for the screws. Make sure that the drill bit is the right size for the screws that you are using. You will also need to make sure that the holes are deep enough for the screws to fit securely.
Step 4: Install the Screws
Once the holes are drilled, you can install the screws. Make sure that the screws are tight and secure. You may need to use a screwdriver to make sure that the screws are tight.
Step 5: Attach the Magnetic Knife Strip
Once the screws are installed, you can attach the magnetic knife strip to the wall. Make sure that the strip is level and secure. You may need to use a level to make sure that the strip is level.
Step 6: Enjoy Your Magnetic Knife Strip
Once the magnetic knife strip is installed, you can enjoy the convenience of having your knives stored safely and conveniently. You can also free up counter space in your kitchen.
How do chefs store their knives
Knives are an essential tool for any chef, and proper storage is key to keeping them in good condition. There are several ways to store knives, depending on the type of knife and the chef’s preference.
Knife Blocks
One of the most popular ways to store knives is in a knife block. Knife blocks are typically made of wood and have slots for each knife. This is a great way to store knives because it keeps them organized and easily accessible. It also helps protect the blades from damage.
Drawer Organizers
Another option for storing knives is to use a drawer organizer. Drawer organizers are typically made of plastic and have slots for each knife. This is a great way to store knives because it keeps them organized and easily accessible. It also helps protect the blades from damage.
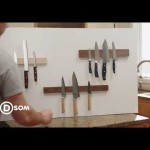
Magnetic Knife Strips
A third option for storing knives is to use a magnetic knife strip. Magnetic knife strips are typically made of metal and have magnets that hold the knives in place. This is a great way to store knives because it keeps them organized and easily accessible. It also helps protect the blades from damage.
Knife Rolls
The final option for storing knives is to use a knife roll. Knife rolls are typically made of fabric and have pockets for each knife. This is a great way to store knives because it keeps them organized and easily accessible. It also helps protect the blades from damage.
No matter which method you choose, proper storage of knives is essential for any chef. Keeping knives organized and protected will help ensure that they stay in good condition and last for many years.
How do you remove a magnetic knife holder
A magnetic knife holder is a great way to store your knives safely and conveniently. But what do you do when you need to remove it? Removing a magnetic knife holder is a simple process that requires a few basic tools.
Step 1: Gather the Necessary Tools
Before you begin, you will need to gather the necessary tools. You will need a screwdriver, a hammer, and a putty knife. Make sure you have the right size screwdriver for the screws that are holding the magnetic knife holder in place.
Step 2: Remove the Screws
Once you have the necessary tools, you can begin to remove the screws. Use the screwdriver to loosen the screws and then remove them. Be careful not to strip the screws as you remove them.
Step 3: Pry the Knife Holder Off the Wall
Once the screws have been removed, you can use the putty knife to pry the knife holder off the wall. Be careful not to damage the wall as you do this. You may need to use the hammer to help you get the knife holder off the wall.
Step 4: Clean Up the Wall
Once the knife holder has been removed, you will need to clean up the wall. Use a damp cloth to remove any residue left behind by the knife holder. You may also need to use a putty knife to remove any stubborn residue.
Step 5: Dispose of the Knife Holder
Once the wall has been cleaned, you can dispose of the knife holder. Make sure to recycle it if possible. If not, you can throw it away in the trash.
Conclusion
Removing a magnetic knife holder is a simple process that requires a few basic tools. With the right tools and a bit of patience, you can easily remove the knife holder and dispose of it properly.
We hope this article has been helpful in showing you how to organize your home with an IKEA magnetic strip. It’s a great way to keep your home neat and tidy, and it’s also a fun and creative way to add a bit of personality to your space. Thank you for reading and we wish you the best of luck in your organizing endeavors! Goodbye and take care!